

How to steam milk for a latte: Tips for silky microfoam
8 minutes
06 August 2026

To steam milk for a latte, start with cold milk, purge the steam wand, introduce a small amount of air near the surface and then submerge the wand slightly to create a smooth whirlpool. Stop steaming around 140–150°F, swirl the pitcher and pour immediately for glossy, velvety microfoam.
Milk steaming is what transforms espresso into lattes, cappuccinos, flat whites and cozy drinks like hot chocolate. When the texture is right, the milk develops fine, integrated bubbles and a naturally sweet, creamy consistency that blends smoothly into espresso.
This beginner-friendly guide focuses on using a steam wand, including the manual steam wands found on KitchenAid® semi-automatic espresso machines, where you control wand position, aeration and texturing. Once you understand these techniques and learn to recognize the right temperature and visual cues, steaming milk at home becomes much more intuitive.
How to steam milk for a latte: Tips for silky microfoam
How to steam milk for a latte: Tips for silky microfoam
How to steam milk for a latte using a steam wand
Steaming milk involves introducing air through aeration, allowing the milk to stretch or expand, and then texturing it into fine, glossy microfoam. A simple five-step rhythm—pour, purge and position, aerate, texture and stop—makes the process easier to understand and repeat.
If you are new to espresso preparation, review how to use an espresso machine before practicing with the steam wand.
Milk steaming terms to know
Baristas use a few common terms to describe the stages of steaming milk. Understanding them before you begin makes it easier to follow the process and recognize the right sound, movement and finished texture.
Aeration: The process of introducing air into the milk by holding the steam tip near the surface. The amount of aeration affects how much foam develops and how light or dense the finished texture feels.
Stretching: The visible expansion of the milk during the early steaming phase as aeration increases its volume. Baristas use this term to describe how much the milk rises in the pitcher, which helps indicate whether enough air has been added for the drink style.
Texturing: Blending the introduced air evenly through the milk after the steam tip is submerged slightly deeper. This phase refines larger bubbles into fine, integrated microfoam.
Whirlpool or rolling: The circular movement created by the position of the steam wand and pitcher. A steady whirlpool distributes heat and helps blend the foam throughout the milk.
Microfoam: Finely textured milk made up of very small, integrated bubbles. Proper microfoam should look glossy and remain fluid enough to blend into espresso or pour latte art.
Purging: Briefly turning on the steam wand before steaming to clear residual water and after steaming to clear remaining milk from the steam openings.
What you need to steam milk
Espresso machine with a steam wand: Use a traditional manual steam wand or follow the model-specific instructions for an assisted wand, such as the KitchenAid® KF2 Pannarello auto steam wand.
Stainless steel milk pitcher: Choose a size that matches your milk volume and gives the milk enough depth to circulate.
Cold milk: Start with chilled dairy or plant-based milk to give yourself more time to aerate, texture and heat it evenly.
Milk thermometer, optional: A thermometer can help you stop within the recommended temperature range while you are learning.
Clean, damp cloth: Keep one nearby to wipe the steam wand immediately after use.

1. Start with the right amount of cold milk
Pour cold milk into a cold stainless steel pitcher, leaving enough headroom for it to expand as you steam. For one latte, approximately 6–8 ounces is often a useful starting point, depending on your cup size and preferred espresso-to-milk ratio.
Start cold: Chilled milk gives you a longer working window before it reaches the target temperature, making aeration and texturing easier to control.
Leave room to expand: Fill the pitcher to about 1 centimeter below the start of the spout rather than to the top.
Match the amount to the drink: Use enough milk for the finished latte without overfilling the pitcher or making the milk too shallow for proper wand placement.
Choose a milk that suits your texture: Whole milk commonly creates creamy, forgiving microfoam, while barista-style oat milk can offer a smooth dairy-free option.
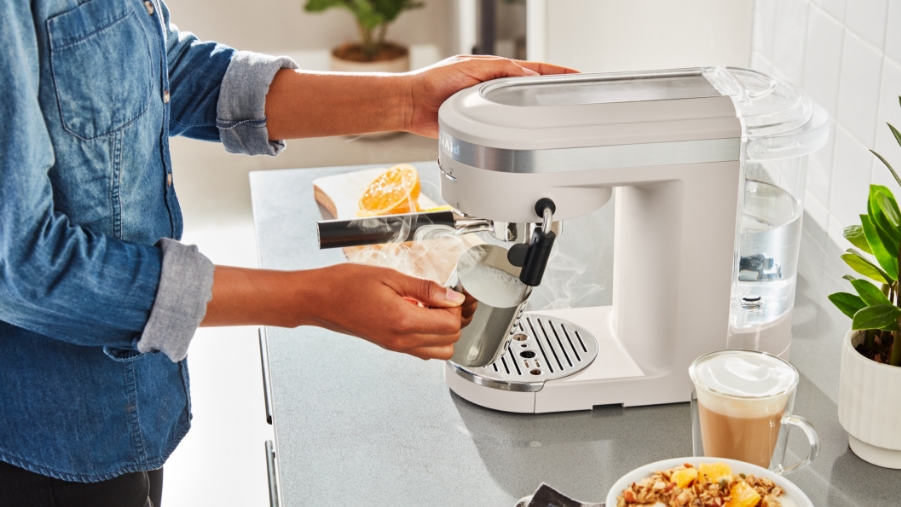
2. Purge the steam wand and position the pitcher
Briefly purge the steam wand, then place the tip just below the milk’s surface near the side of the pitcher. A slight pitcher angle helps establish the steady circulation needed for fine, even microfoam.
Purge before steaming: Turn on the steam briefly to clear residual water or buildup so the wand delivers steam rather than adding condensation to the milk.
Use the 3 o’clock position: Place the wand near the side of the pitcher at roughly the 3 o’clock position instead of directly in the center.
Keep the tip near the surface: The steam openings should sit just below the milk during the initial aeration phase.
Angle the pitcher slightly: This positioning encourages a controlled whirlpool that distributes heat and air evenly.
Hold the setup steady: Once the milk begins circulating smoothly, avoid moving the wand around unnecessarily.
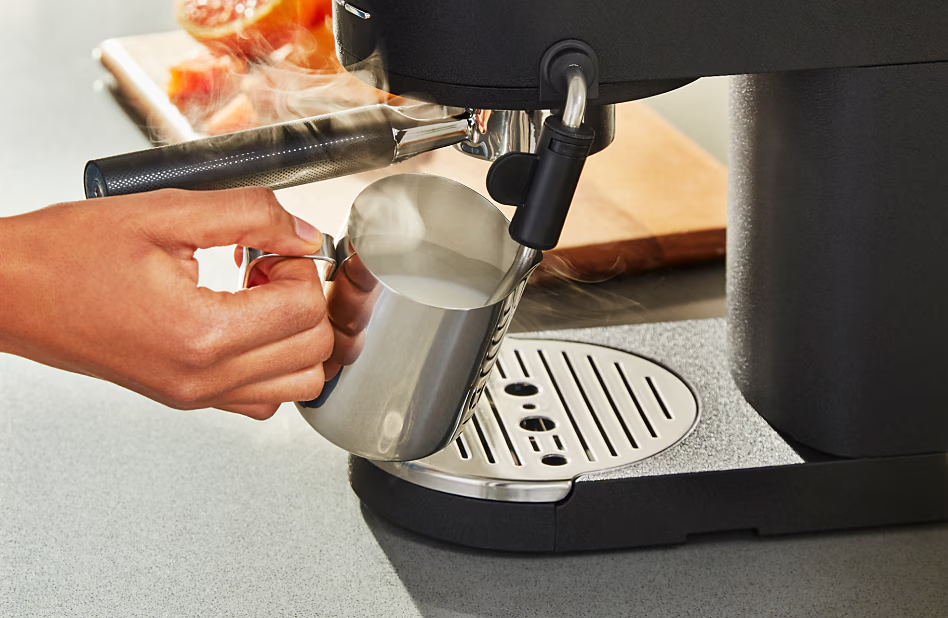
3. Stretch the milk with a light aeration phase
Turn the steam fully on and introduce a small amount of air while the wand tip remains near the surface. For latte microfoam, this stretching or aeration phase should be brief and controlled.
Listen for a soft sound: A gentle hissing or paper-tearing sound signals that small amounts of air are entering the milk.
Keep latte aeration short: Lattes need a thin layer of integrated microfoam rather than a thick cap of airy foam.
Watch the wand depth: If the tip sits too high, it may sputter and create large bubbles. If it sits too deep, the milk may heat without aerating.
Adjust the pitcher gradually: Raise or lower the pitcher slightly until the sound becomes soft and steady.
Add more air only for foam-forward drinks: Cappuccinos generally need a longer stretching phase than lattes or flat whites.
Avoid overstretching: Introducing air for too long creates thick foam that sits above the milk instead of blending smoothly through it.

4. Texture the milk into glossy microfoam
After introducing enough air, raise the pitcher slightly so the steam tip sits deeper beneath the surface. Maintain a rolling whirlpool that folds the foam into the milk and refines larger bubbles into a fine, even texture.
Create continuous circulation: The milk should move in a smooth rolling motion rather than splash or spin aggressively.
Adjust the pitcher angle as needed: If the whirlpool weakens, tilt the pitcher slightly or position the wand farther off center.
Look for a glossy finish: Properly textured milk should appear shiny and flow with a paint-like consistency.
Avoid stiff or dry foam: A thick foam cap or large visible bubbles usually means too much air was introduced during stretching.
Monitor the temperature: Stop before the milk becomes overheated, since excessive heat can diminish sweetness and produce a burnt flavor.

5. Stop at the right temperature and pour immediately
Stop steaming when the milk reaches approximately 140–150°F. Turn off the steam before removing the wand, then tap, swirl and pour promptly while the milk is still fluid and integrated.
Use a thermometer for consistency: A thermometer provides the clearest temperature cue, especially while you are learning.
Use touch as a secondary guide: Without a thermometer, stop when the pitcher feels hot and becomes difficult to hold comfortably for more than a moment.
Turn off the steam first: Shut off the steam before lowering the pitcher to reduce splashing and prevent additional air from entering.
Tap away surface bubbles: Gently tap the pitcher on the counter to release a few remaining visible bubbles.
Swirl until uniform: Rotate the pitcher until the milk looks glossy and the foam is fully integrated.
Pour without delay: Milk can begin separating as it sits, making it less fluid and harder to blend into espresso or control for latte art.
As you practice, explore different types of espresso drinks to see how aeration and foam levels change from lattes to cappuccinos, cortados and flat whites.
Shop KitchenAid® semi-automatic espresso machines
KitchenAid® semi-automatic espresso machines balance hands-on control with features designed to make at-home espresso preparation more approachable. Choose from models with a built-in burr grinder and Smart Dosing Technology for a more integrated bean-to-cup workflow.
A multi-angle steam wand gives you control over aeration and texturing, helping you create fine microfoam for lattes, fuller foam for cappuccinos and warm milk for other café-style drinks. Select models are also compatible with the KitchenAid® Automatic Milk Frother Attachment, sold separately or available in select bundles, for programmable milk dispensing and adjustable microfoam.
Explore KitchenAid® semi-automatic espresso machines to compare grinding, steaming and milk-frothing options for your home espresso routine.

Tips for smoother, silkier microfoam
Once you have the basic steaming motion in place, milk type, starting temperature, pitcher size and drink style can all shape foam volume, consistency and pouring control.
Choose the best milk for latte texture
Different milks create different levels of body, foam and stability. Starting with cold milk is important regardless of the type you choose, and barista-style plant milks are often formulated to produce more consistent results than standard versions.
Whole milk: Often a forgiving choice for beginners, it creates a rich mouthfeel and smooth, creamy microfoam that blends easily into espresso.
Low-fat dairy milk: This option can produce more visible foam but usually has a lighter body and less richness than whole milk.
Skim milk: It often aerates readily and creates plentiful foam, although the finished texture may feel lighter and less creamy.
Barista-style oat milk: Many formulations create stable foam and a creamy dairy-free consistency suitable for lattes and flat whites.
Almond milk: This milk often produces a lighter texture and may separate more easily if it is overheated or aerated too aggressively.
Soy milk: It can develop a dense foam, but performance and heat stability vary by formulation.
Plant-based milks differ by brand and ingredient blend, so adjust one variable at a time as you practice.

Match your pitcher size to your drink
Choose a pitcher that gives the milk enough room to circulate without making the liquid too shallow for proper wand placement. An oversized pitcher can make it difficult to build a steady whirlpool when steaming a small amount of milk.
Use a 12-ounce pitcher for one drink: This size often provides enough depth for proper wand placement while keeping the milk volume manageable.
Choose a 20-ounce pitcher for larger volumes: A larger pitcher can offer more room when preparing two drinks or steaming extra milk.
Match the pitcher to your recipe: The ideal size depends on your cup size, espresso-to-milk ratio and preferred drink style.
Leave room for expansion: Fill the pitcher only enough to position the steam tip correctly while allowing the milk to expand during steaming.
Consider the spout shape: A pronounced spout can provide greater control when pouring latte art.
Regardless of pitcher capacity, select a size that allows the milk to circulate smoothly and create a consistent whirlpool during steaming.
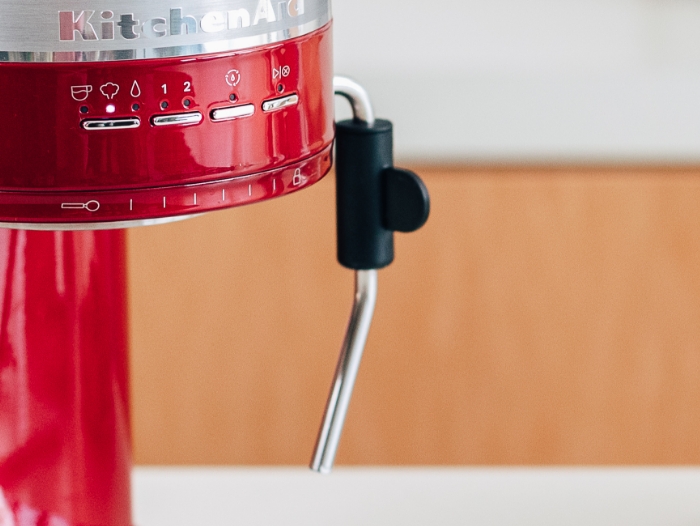
Practice steam wand positioning without wasting milk
If you want to practice and refine your steam wand technique without using milk, some beginners use water with a very small drop of dish soap in a stainless steel pitcher. This mixture can mimic some of the visible circulation and foaming behavior of milk, allowing you to work on pitcher angle, wand depth and whirlpool control without wasting ingredients. However, it will not reproduce the same microfoam texture, temperature cues or pouring qualities as real milk.
Use this method as an occasional technique exercise to build confidence and consistency before practicing with milk. Once you are comfortable with wand positioning and creating a steady whirlpool, switch to real milk to develop texture and pouring skills. Afterward, empty and thoroughly rinse the pitcher, wipe the steam wand and purge it with clean water before preparing a drink. Follow the cleaning instructions for your specific espresso machine.

Understand latte vs. cappuccino vs. flat white milk
Lattes, cappuccinos and flat whites use the same basic steaming process, but each calls for a different aeration level during the initial stretching phase. A higher aeration level means keeping the steam tip near the surface longer so more air enters the milk and its volume increases. A lower aeration level means moving into texturing sooner to keep the milk denser and more fluid.
Drink | Aeration Level | Stretching Guidance | Finished Milk Texture |
Latte | Moderate | Introduce a small amount of air near the beginning. Once the milk expands slightly, raise the pitcher so the steam tip sits deeper and begin texturing. | Silky, fluid microfoam with a thin, integrated foam layer |
Cappuccino | High | Continue stretching longer than you would for a latte so the milk expands more before moving into the texturing phase. | Lighter, fuller foam with more volume |
Flat white | Low | Introduce very little air, then begin texturing almost immediately to keep the milk from developing a distinct foam layer. | Fine, glossy microfoam with minimal visible foam |
Aeration level relates to the amount of air incorporated into the milk rather than a universal number of seconds. Steam power, milk volume, pitcher size and milk type all affect how quickly stretching happens. Listen for a soft hissing sound, watch how much the milk expands and use the finished texture as your guide.
Drink styles can also vary by café and recipe. In general, a latte should remain fluid and easy to pour, a cappuccino should have noticeably more foam volume and a flat white should have fine microfoam that blends closely with the espresso.
Learn more about the differences between a flat white and latte.

How to use a steam wand for drinks beyond a latte
Once you can create consistent latte microfoam, small changes in aeration level, milk volume and finished texture make it possible to prepare cappuccinos, cortados, flat whites, café au laits and warm milk-based favorites.

Adjust texture for cappuccinos, flat whites and more
Use the same basic steaming process for different espresso drinks, but adjust the stretching phase based on how much foam and body you want.
Cappuccino: Use a high aeration level by keeping the steam tip near the surface longer than you would for a latte. Once the milk has expanded noticeably, move into texturing to create lighter, fuller foam.
Flat white: Use a low aeration level by introducing very little air and beginning the texturing phase almost immediately. The finished milk should remain dense, glossy and fluid, with minimal visible foam.
Cortado: Keep aeration low and use a smaller overall milk volume so the espresso remains more pronounced.
Café au lait: Gently steam milk with minimal foam, then pair it with brewed coffee instead of espresso.
Drink styles and proportions can vary by café or recipe, but the same principle applies: more stretching creates greater foam volume, while less stretching keeps the milk denser and more integrated.

Steam milk for hot chocolate and other non-espresso drinks
A steam wand can also heat and lightly texture milk for hot chocolate, matcha lattes, chai and other warm café-style drinks. Adjust aeration based on whether you want a silky consistency or a more noticeable foam layer.
Hot chocolate and mochas: Mix cocoa, chocolate or syrup into the serving cup, then add freshly steamed milk. Keeping these ingredients out of the pitcher helps prevent residue from entering the steam wand.
Matcha lattes: Whisk the matcha separately, then add lightly aerated milk for a smooth drink with a soft foam layer.
Chai lattes: Combine chai concentrate or brewed tea with steamed milk, using moderate aeration for a creamier finish.
Warm milk drinks: Use minimal aeration when you want heated milk with a smooth texture rather than a thick foam cap.
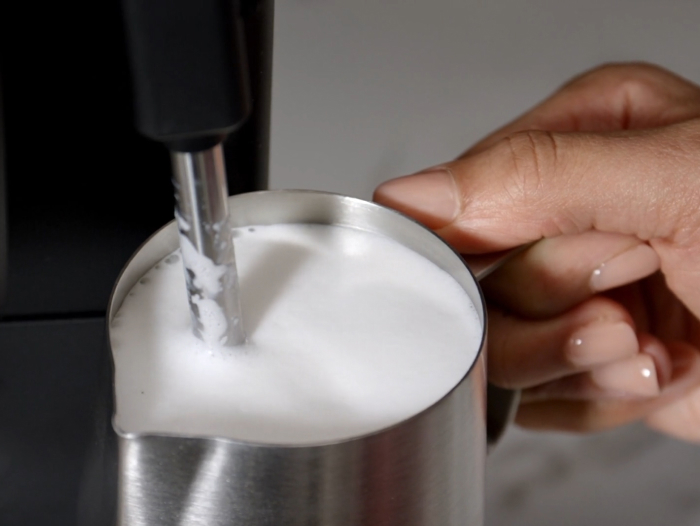
Troubleshooting and cleaning your steam wand
Most milk-steaming issues come down to wand depth, pitcher position, aeration time or temperature. Matching the result you see or hear to a specific adjustment can improve the next pour.
Fix large bubbles, thin milk and weak foam
Use these troubleshooting cues to adjust wand position, airflow and circulation:
Large bubbles: The steam tip may be too high or introducing air too aggressively. Lower it slightly until you hear a softer, steadier hiss.
Thin milk with little foam: The tip may be too deep during the initial aeration phase. Lower the pitcher slightly to bring the tip closer to the surface and introduce more air.
Too much foam: The stretching phase lasted too long. Introduce air for less time and move into texturing sooner.
Weak foam: Start with cold milk and confirm that the tip is close enough to the surface during aeration. Milk type and formulation can also affect foam volume.
Screeching sound: Adjust the wand depth. A sharp sound often means the tip is not positioned correctly for controlled aeration.
No whirlpool: Tilt the pitcher slightly and position the wand near the side rather than directly in the center.
Splashing or aggressive spinning: The steam tip may be too close to the surface or the pitcher angle may be too steep. Reposition it for smoother, more controlled circulation.
Separated foam: Swirl and pour promptly. On the next attempt, shorten the aeration phase and spend more time integrating the foam through a steady whirlpool.
Dry, spoonable foam: Too much air was introduced without enough time spent texturing it into the milk.
Avoid overheating and start fresh when needed
Overheated milk may lose sweetness, develop a burnt flavor and become more difficult to pour smoothly. Stop steaming around 140–150°F rather than continuing simply to create more foam.
Stop within the target range: Use a thermometer when possible, especially while learning.
Start over when milk is overheated: If it becomes scorched, heavily separated or grainy, replace it with a fresh cold pour.
Avoid re-steaming: Heating the same milk again usually produces flatter foam and increases the risk of overheating.
Tap and swirl minor bubbles: If the milk is still within the target temperature range, a gentle tap and swirl may be enough to improve a few visible surface bubbles.
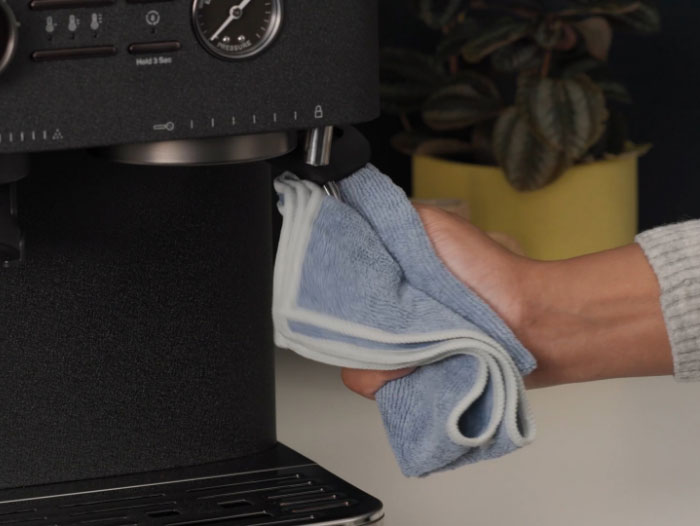
Clean and purge the steam wand after each use
Clean the steam wand immediately after steaming so milk residue does not dry on the surface or collect in the steam openings.
Wipe the wand: Use a clean, damp cloth as soon as the wand comes out of the milk.
Purge after steaming: Briefly turn on the steam to clear remaining milk from the openings.
Follow model-specific care instructions: Some steam wand components may require periodic removal or deeper cleaning.
Maintain the espresso machine: Keep up with the recommended cleaning and descaling cycles to support consistent steam flow and performance.
Learn more about how to clean and descale an espresso machine.

Steam milk FAQs
These quick answers cover temperature, terminology and common drink-preparation questions that may come up after learning the basic steaming technique.
What is the best way to heat milk for a latte?
The best way to heat milk for a latte is with a steam wand. A steam wand heats and aerates the milk at the same time, creating smooth microfoam that blends evenly with espresso. Start with cold milk, introduce a moderate amount of air and then maintain a whirlpool until the milk becomes smooth, glossy and fully integrated.
What is the best temperature to steam milk for a latte?
A useful target for steamed latte milk is approximately 140–150°F. This range creates a warm drink while helping the milk retain its sweetness and fluid texture. Use a thermometer for greater consistency, particularly while learning to judge the temperature by touch.
Is frothing milk the same as steaming milk?
Not exactly. Frothing typically introduces more air to create a larger volume of foam, while steaming combines heat, controlled aeration and texturing to produce fine, integrated microfoam. The right technique depends on whether you want fuller cappuccino foam or fluid milk for a latte or flat white.
Learn more about how to use a milk frother.
Can you steam milk twice for a latte?
It is generally better to steam milk only once. Reheating it can flatten the foam, diminish sweetness and increase the risk of overheating. If the first pitcher does not develop the texture you want, begin again with fresh cold milk for a more consistent result.
How do you steam milk for latte art?
Use a moderate aeration level, then create a steady whirlpool that produces glossy, paint-like microfoam. Tap and swirl the pitcher after steaming, then pour immediately while the milk is still fluid and integrated. Thick, dry or separated foam is more difficult to control for detailed designs.
Is cold foam the same as steamed milk?
No. Steamed milk is heated, aerated and textured to create warm microfoam for drinks such as lattes and cappuccinos. Cold foam is aerated without heat and is generally served over iced coffee, iced lattes or other cold espresso drinks. The techniques create different temperatures, consistencies and drinking experiences.
How do you make cold foam at home?
To make cold foam at home, start with cold milk and aerate it with a milk frother, hand blender or blender until it becomes light, smooth and thick enough to sit on top of a cold drink. Use short blending intervals to avoid creating large bubbles or overworking the foam, then spoon or pour it over iced coffee or an iced latte.
Do you steam milk for an iced latte?
Iced lattes are usually made with cold milk poured over espresso and ice, so you do not need to steam the milk. Add cold foam separately if you want a light, aerated topping without warming the drink.