

KitchenAid® fully automatic espresso machine tips
10 minutes
31 July 2026

KitchenAid® fully automatic espresso machines are designed to bring your favorite café-style drinks into your daily routine with intuitive controls, precise grinding and thoughtfully programmed options for espresso, coffee, milk drinks, iced beverages and more.
This guide can help you get even more from your machine when you want to personalize the experience, fine-tune flavor or adjust a drink to better fit your beans, cup size or milk texture preferences. Use these tips to understand how beans, water, grind, strength, body, volume, temperature and cleaning habits can help support rich espresso flavor, smooth milk texture and consistently enjoyable drinks.
KitchenAid® fully automatic espresso machine tips
KitchenAid® fully automatic espresso machine tips
Getting set up for better daily drinks
A thoughtful setup can make your fully automatic espresso machine easier to use, refill and clean day after day. Before you start personalizing drinks, focus on the basics that shape your routine: where the machine lives, how you prep the water tank and which beans you keep ready for brewing.
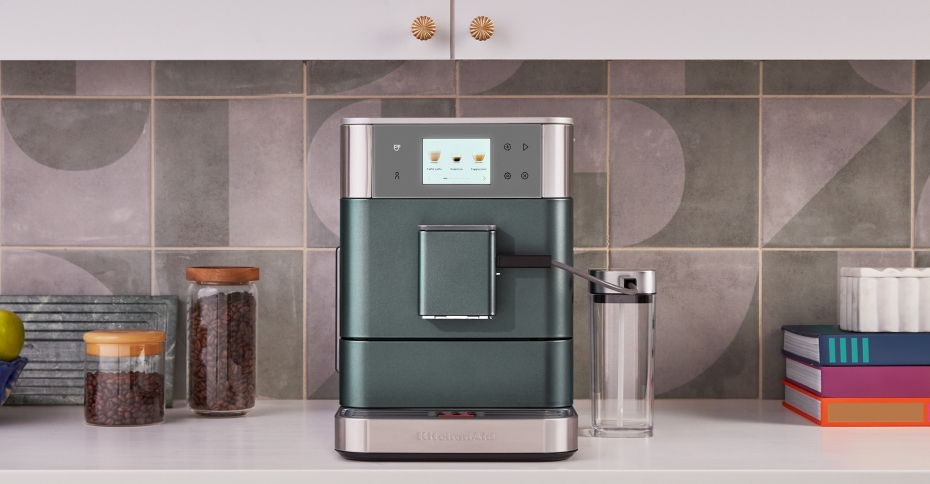
Choose the right spot for the machine
Place your fully automatic espresso machine on a dry, flat, level surface with easy access to the water tank, bean hopper, drip tray and dispenser. These are the parts you’ll interact with most often, so the right placement can make everyday brewing, refilling and cleanup feel more seamless.
Leave enough clearance above and around the machine to add beans, remove or refill the water tank, empty the drip tray and access the service door when needed. Mobility wheels at the back of the machine make it easier to gently move the unit forward on the countertop when you need access to the water tank or bean hopper. On models with adjustable grind settings, make sure you can comfortably reach the right side of the machine, where the service door is located. For a comparison of model dimensions and features, explore which KitchenAid® espresso machine is right for you.
A dedicated coffee station can also help keep your routine organized. Store mugs, beans, milk accessories or syrups nearby so everything you need for espresso, coffee, lattes, cappuccinos and iced drinks is easy to reach.
Explore ideas for how to make a coffee bar while choosing your setup.

Run first-use rinse and prep cycles
Before brewing your first drink, follow the machine prompts for setup, rinsing and water hardness. First-use rinsing helps prepare the internal lines, warms the brew path and gives you a cleaner starting point for your first cup.
Clean and place removable parts: Wash or wipe the parts your manual recommends before first use, then make sure the water tank, drip tray, dispenser and service door are fully seated.
Install or program the water filter: If you use the included water filter, set the filter state and rinse the new filter according to the product manual. If you choose not to use a filter, program the machine for that setting instead.
Run the first-start routine: Place a container under the dispenser or steam wand as directed, then let the machine heat, rinse and complete any required setup steps before you brew.
Brew a few test cups: The first drinks are useful for learning the controls and clearing the system. Taste after a few cups before making big adjustments to grind or strength.

Choose fresh, whole beans for better flavor and performance
Fresh, whole roasted beans give your fully automatic espresso machine a better starting point for balanced flavor, crema and consistent grinding. Fill the bean hopper with whole roasted coffee beans and avoid treated beans or anything that could leave sticky residue in the grinder.
Use whole, roasted coffee beans: Whole beans are designed for the bean hopper and allow the machine to grind fresh for each drink. Fresher beans can also help support better crema and a fuller espresso flavor.
Avoid beans treated with additives: Do not use coffee beans treated with additives like sugar, since they can damage the grinder. Flavored, coated or caramelized beans may leave behind residue that affects performance over time.
Be mindful with very oily beans: Darker, oilier beans may leave residue on the bean hopper walls or move through the grinder differently. Because darker roasts often extract more quickly, try a slightly coarser grind if the coffee tastes bitter, harsh or overly heavy. If you notice buildup, clean the bean hopper with a dry cloth and avoid adding water or liquid to the hopper.
Match grind adjustments to roast level: If you change beans or roast styles, you may need to adjust the grind. A finer setting often works well for light roasts, while a coarser setting is typically better for dark roasts. Only adjust the grind while the grinder is running.
Keep beans fresh between drinks: Add only what you expect to use over the next few days, especially if you like switching between medium roasts, darker espresso blends or decaf. A shorter supply in the hopper can help preserve aroma and flavor.
For more guidance, explore how to store coffee beans so they stay fresher between brews.
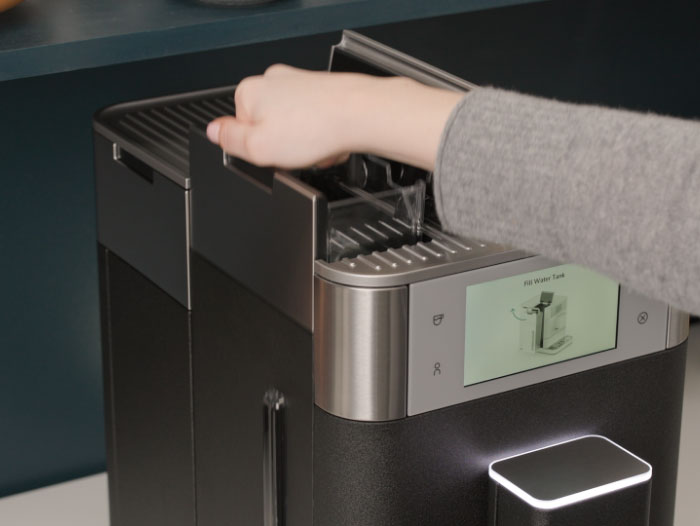
Use cold, fresh water and set up the filter correctly
Water quality shapes both flavor and maintenance. Fill the water tank with cold, fresh tap water, refresh it daily when you use the machine and avoid deionized or mineral water.
Start with cold, fresh tap water: Fill the water tank with cold, fresh tap water or filtered water from the refrigerator, and refresh it each day you use the machine. This helps support cleaner flavor and prevents stale water from sitting in the tank.
Avoid deionized or mineral water: Do not use deionized or mineral water in the water tank. Cold, fresh tap water is the recommended starting point.
Install and rinse the water filter if using one: If your model includes a water filter, install it during setup and follow the machine prompts to rinse it through the system. Using the filter can help reduce how often the machine needs descaling.
Set the correct water filter state: If you use the water filter, make sure the machine is set to recognize it as installed. If you choose not to use the filter, update the machine’s filter state so maintenance reminders stay accurate.
Test and set water hardness: Use the included water hardness test strip and program the water hardness level based on your results. This helps the machine align cleaning and descaling prompts with your water source.
Replace the filter when prompted: Replace the water filter when the machine indicates it is time. Keeping up with filter replacement helps support your water-care routine and long-term machine maintenance.

Making your first drink
Your first drink should be simple: choose espresso or an americano, review the strength, body, volume and temperature, then let the machine grind and brew. If you need a quick overview of the menu and setup path, explore the fully automatic espresso machine guide before brewing.

Select a simple first drink
Start with an espresso or americano so you can taste the coffee clearly before adding milk, ice or flavored ingredients. A simple espresso shot gives you a baseline for how your beans, grind and current drink settings are showing up in the cup.
As you sip, notice both flavor and feel. Your coffee may taste bright and fruit-forward, smooth and nutty, chocolatey and rich or bold and roasty depending on the beans and roast level. It should taste balanced and pleasant—not overly sour, bitter, weak, burnt or flat. The texture should feel smooth and satisfying on the palate, not thin, gritty, watery or overly heavy.
Use your first cup to answer a few simple questions:
Does the coffee taste bold enough? A well-balanced cup should taste clear and flavorful without feeling harsh or overwhelming. If it tastes too mild, muted or intense, the strength setting may need to be adjusted.
Does the espresso have the right body? Body is the fullness or weight of the drink. It should feel smooth and rounded, not watery, hollow or too heavy. If the flavor seems close but the mouthfeel feels off, the body setting may be worth adjusting.
Does the flavor taste balanced? Espresso should not taste sharply sour, unpleasantly bitter or burnt. If the flavor leans too sour, bitter or harsh, the grind may need to be adjusted based on your beans and roast level.
Does the drink feel too short, too long or diluted? The volume should match the drink style and cup size you want. If the coffee tastes overly concentrated, too diluted or out of proportion for your cup, the drink volume may need to be adjusted.
Is the temperature right for you? The drink should feel comfortably hot without tasting scorched. If it cools too quickly or feels cooler than you prefer, the temperature setting or cup preheating may be worth adjusting.
Once you know what you like—or what feels slightly off—you can move into the machine’s customization settings with a clearer goal.

Adjust strength, body, volume and temperature
The best way to personalize a fully automatic espresso machine is to change one setting at a time. Adjust strength, body, drink volume or temperature individually, then brew again so you can taste how each change affects flavor, texture and balance.
Strength: This controls how bold or concentrated the coffee tastes. Increase it when a drink tastes thin or muted, especially for milk drinks where espresso needs enough intensity to stand up to foam or steamed milk. Lower it if the drink tastes too strong, heavy or bitter for your preference.
Body: This setting affects mouthfeel, or how light, balanced or full the drink feels as you sip. Choose a lighter option for a cleaner, more delicate cup, a medium option for everyday balance or a stronger option when you want a richer, more substantial espresso-style drink.
Volume: This changes how much coffee, water or milk is dispensed, depending on the drink type. A shorter pour can create a richer, more concentrated espresso-style drink, while a longer volume works well for coffee, lungo or americano-style sipping. Adjust milk volume separately when you want a creamier latte, a stronger coffee-forward cappuccino or a smaller milk drink.
Temperature: This affects how hot the drink tastes and can influence the way flavor comes through in the cup. Raise it if your espresso feels cooler than you prefer, especially for smaller drinks that lose heat quickly. You can also preheat the cup with hot water before brewing to help the drink stay warmer.
On supported models, save favorite drinks after you land on settings that work well for your cup size, roast and routine. Profiles are especially useful in shared households where different people prefer different strengths, volumes, temperatures or milk levels.

Try milk drinks once the basics feel familiar
Once espresso tastes balanced on its own, move into milk drinks one recipe at a time. Cappuccinos, lattes, flat whites and macchiatos each shift the balance between espresso strength, body, milk volume and foam texture.
For KF2 models: Use the Pannarello auto steam wand to steam milk to your preferred temperature and texture, then purge and clean the steam wand after every use.
For KF3 and KF6 models: Use the milk hose with your preferred milk container when preparing milk-based drinks, then follow the milk cleaning prompts after brewing.
For KF4, KF7 and KF8 models: The included milk container can support a more integrated milk drink routine, especially for back-to-back cappuccinos or lattes.
For plant-based milk drinkers: On KF8 models, the alternative milk cycle is designed for plant-based milk routines. Oat, almond and other plant-based milks vary by formula, so texture may differ from dairy milk.
Cold milk straight from the refrigerator is commonly preferred for smoother frothing and more stable foam. Dairy milk generally creates richer foam, while oat milk or almond milk may create a lighter texture depending on protein and fat content.

Dialing in flavor and customization
Dialing in a fully automatic espresso machine is a process of small, intentional adjustments. Start with the beans, then fine-tune grind size, strength, body, volume, temperature and milk texture based on what you taste in the cup.

Experiment with bean choices
Your coffee bean roast level can influence flavor, extraction and the grind setting that works best. Medium roasts are often a good starting point because they balance crema, body and sweetness. Darker roasts tend to taste fuller and more roasty, while lighter roasts can taste brighter or fruitier and may need a finer grind to feel balanced.
Brew a few drinks before adjusting: When you add a new bean type or roast, brew a few drinks before changing the strength, grind or volume settings. On select models, the IntelliGrind system detects the bean type and roast and fine-tunes the coffee dose. Giving the machine a few brewing cycles provides a more reliable baseline before you decide whether further adjustments are needed.
Keep decaf or specialty beans intentional: If your model offers pre-ground coffee mode or a removable bean hopper, use those features when you want an occasional decaf or a different roast without fully changing your daily beans.
Watch for oily residue: If beans leave a visible film in the hopper, wipe the hopper with a dry cloth from time to time and consider a less oily roast.
Learn more about different types of coffee beans so you can choose a roast that matches your preferred flavor, body and drink style.

Change grind, strength and body one step at a time
When customizing espresso, adjust grind, strength or body one step at a time so you can understand how each change affects flavor, texture and balance. Brew again after each adjustment before making another change, and only adjust grind size while the grinder is running. Once the drink tastes balanced and feels right for your cup size, roast and routine, save it as a preset or profile on supported models.
What you notice | Adjustment to try | How it can help |
Espresso tastes sour, sharp or thin | Move to a finer grind | A finer grind can support a fuller extraction, especially with lighter roasts. |
Espresso tastes bitter, harsh or drips out very slowly | Move to a coarser grind | A coarser grind can help reduce over-extraction and may work better for darker roasts. |
Coffee tastes mild, muted or gets lost in milk drinks | Increase strength one level | More strength can help espresso taste bolder and stand up to steamed milk or foam. |
Coffee tastes too intense, heavy or concentrated | Lower strength one level | Less strength can create a smoother, more approachable cup. |
Flavor tastes balanced, but the drink feels too light or watery | Choose a fuller body setting | A fuller body can create a richer, rounder espresso-style mouthfeel. |
Flavor tastes balanced, but the drink feels too heavy | Choose a lighter body setting | A lighter body can create a cleaner, more delicate cup. |

Match settings to the drink in your cup
Different drinks benefit from different levels of strength, body, volume and temperature, so use the drink style as your starting point. A small espresso may need more concentration and heat retention, while a milk drink may need enough coffee strength to stand up to foam or steamed milk. Iced drinks often need a bolder setting or shorter pour so the flavor still tastes balanced as the ice melts.
Start with the default or suggested settings below, adjust one setting at a time, then save your favorite combination as a preset or profile on supported models once the drink tastes right for your cup size, beans and routine.
Drink style | Recommended starting settings | Why it works |
Espresso | Higher strength, fuller body, shorter volume, medium-high temperature | Creates a concentrated, espresso-style cup with richer mouthfeel and enough heat for a small serving. |
Coffee | Medium strength, medium body, longer volume, medium temperature | Supports an easy-drinking cup that feels balanced rather than overly concentrated. |
Americano | Medium-high strength, medium body, higher water volume, medium-high temperature | Lets the espresso flavor come through while creating a longer, smoother drink. |
Cappuccino | Higher strength, fuller body, moderate coffee volume, moderate milk volume | Helps the espresso hold its own against foam while keeping the drink coffee-forward. |
Latte | Medium-high strength, medium or fuller body, moderate coffee volume, higher milk volume | Creates a smoother, creamier drink while keeping enough espresso flavor under the milk. |
Flat white | Higher strength, fuller body, shorter coffee volume, lower milk volume | Keeps the drink rich, velvety and espresso-forward. |
Iced coffee or over-ice espresso | Higher strength, medium-full body, slightly shorter volume, lower over-ice brew temperature if available | Helps the coffee stay flavorful as ice melts and reduces the chance of a watery-tasting drink. |
For a deeper look at how these drink styles compare, learn more about espresso vs. coffee and types of espresso drinks.

Choose the right milk for the texture you want
Milk choice affects how creamy, light, airy or stable your foam feels in the cup. Milk froth texture refers to the consistency, density and stability of steamed or frothed milk, ranging from lighter, airier foam for cappuccinos to smoother, velvety microfoam for lattes and flat whites. Dairy milks and plant-based milks can create different results depending on fat, protein, sugar content and formulation, and some milk types may perform better than others depending on the drink and machine settings.
For the best texture, use cold milk straight from the refrigerator. Cold milk gives the machine more time to incorporate air and build a smoother, more stable foam as it heats. The way milk is textured can also vary by model: the KitchenAid® KF2 uses a steam wand, while the rest of the fully automatic lineup features an automatic milk system. For plant-based milk customization, the KitchenAid® KF8 is the only model with a dedicated alternative milk cycle. This cycle adjusts the balance of air and steam for the different fat and protein content of plant-based milks, adding more air early in the frothing process to support creamy, stable foam.
Whole milk: This is often the coffee-shop standard for lattes and cappuccinos because the higher fat content helps create a creamy texture, smooth mouthfeel and balanced sweetness. It’s a strong starting point when you want café-style foam and a fuller finish.
2% milk: This option offers a middle ground between richness and lightness. It can still create a smooth milk drink, but the texture may feel slightly less creamy than whole milk.
Skim milk: Lower-fat milk can create lighter, airier foam, but the drink may taste less creamy. It can work well for a drier cappuccino-style texture, though it may feel less velvety in lattes or flat whites.
Oat milk: Barista-style oat milk is often one of the best plant-based options for espresso drinks because it tends to create a creamier texture and more rounded flavor than many nut-based milks. It can work especially well in lattes and iced drinks.
Soy milk: Soy milk can create a relatively stable foam and a fuller texture, depending on the brand. It may have a more noticeable flavor, so it pairs best with beans that can balance its natural nuttiness.
Almond milk: Almond milk usually creates a lighter texture and may foam less consistently than oat or soy milk. It can work well for a lighter drink, but the result may feel thinner or less creamy.
Other plant-based milks: Coconut, cashew, pea-protein and blended barista-style milks can vary widely. Look for versions labeled “barista” if you want better foam stability and a smoother texture.
When making milk-based adjustments, stick with one milk type while you fine-tune milk volume or foam level. Once your latte, cappuccino or flat white has the texture and balance you like, save the drink as a preset or profile on supported models.

Save profiles and presets around real drink habits
Profiles and presets make it easier to repeat the drinks you make most often. A preset is a saved drink recipe, such as a latte with your preferred strength, body, volume, temperature, milk level or foam. A profile is a place to store personalized presets, which can be especially helpful in shared households where different people like different drinks.
On supported models, you can save customized drink settings so favorite drinks are easier to brew again. The KitchenAid® KF3, KF4, KF6 and KF7 models offer up to four user profiles, while the KF8 offers up to six. Personalized usernames are available on the KF4, KF7 and KF8 models.
These profile organization ideas can help you make your go-to drinks easier to find:
Organize by coffee drinker: In shared households, create profiles for different people so each person can quickly access their preferred strength, body, volume, temperature and milk settings. One person may prefer a stronger espresso, while another may want a larger latte with more milk.
Organize by bean style: If you switch between espresso blends, lighter roasts, darker roasts or decaf, save settings that match each bean. A lighter roast may work better with a finer grind or higher strength, while a darker roast may taste smoother with a coarser grind or lower strength.
Organize by cup size: Set up profiles around the mugs or cups you use most often, such as 6 oz or 8 oz. This can be helpful if you regularly make a smaller cappuccino, a medium latte or a larger coffee-style drink.
Organize by time of day: Create profiles for Morning, Afternoon and Evening if your coffee preferences change throughout the day. For example, you might save a stronger morning espresso, an afternoon iced coffee and a smaller evening decaf.
Once a drink matches the way you like to enjoy it, save the settings under the profile that fits that routine best.

Cleaning and daily habits
Regular cleaning helps protect espresso flavor, milk texture and long-term machine performance. Build a simple routine around rinsing, emptying, wiping and following cleaning prompts so coffee oils, milk residue and mineral buildup don’t interfere with the drinks you make every day.

Keep up with routine and prompted cleaning
Daily care focuses on the parts that collect water, coffee grounds and milk residue, while deeper maintenance should follow your model’s prompts and owner-manual guidance.
After daily brewing: Empty the drip tray and used grounds container, rinse removable parts as directed and refresh the water tank with cold, fresh water each day you use the machine.
After milk drinks: Clean or rinse the milk system as soon as possible after use. Models with an automatic milk system prompt you to run Easy Milk Rinsing, which should be completed no later than before switching off the machine. Complete the deeper milk system cleaning cycle when prompted to help remove residue that a quick rinse may not fully address. On KF2 models, purge and clean the steam wand after every use.
Each week: Check the bean hopper for oily residue and wipe it with a dry cloth. Remove the brew unit, rinse it with cold water and let it dry before reinstalling it. Inspect milk-system parts for buildup and clean them according to your model’s instructions. On KF2 models, deep-clean the steam wand weekly or as needed.
As needed or when prompted: Complete brew-unit cleaning, deep milk cleaning, filter replacement and descaling programs when indicated by the machine. Maintenance intervals vary based on usage, water hardness and filter use. As a general guide, replace the water filter after about 50 L of use. On KF2 models, filter replacement is typically needed every two months, brew-unit cleaning every 6–8 weeks and descaling about every six months.
If you want a full walkthrough, review how to clean and descale an espresso machine.

Build a routine that feels easy to repeat
Keep your routine simple: check water, check beans, empty the drip tray, rinse milk parts and test simple drinks before saving favorites. This creates a steady baseline while you learn how strength, body, volume and temperature affect each cup.
Reset the machine before busy mornings: Refill water, check beans and empty the drip tray the night before or at the start of the day so back-to-back drinks feel uninterrupted.
Limit your experiments: Change only one setting per drink, then write down or save what worked. This reduces wasted beans and makes results easier to repeat.
Plan for milk drinks: Keep cold milk ready, clean milk parts right after use and return milk to the refrigerator promptly when your model uses a milk container or separate milk carton.
Use profiles after you taste-test: Save your favorite espresso, iced coffee or cappuccino settings once you know the flavor, body, volume and temperature work for your beans, cup size and milk choice.

Fully automatic espresso machine FAQs
These quick answers cover a few follow-up questions about setup, flavor adjustments and cleaning routines for KitchenAid® fully automatic espresso machines.
What coffee beans work best in a fully automatic espresso machine?
Roasted, untreated whole beans work best in a fully automatic espresso machine. Medium roasts are often a balanced starting point, while darker roasts may need a coarser grind and lighter roasts may need a finer grind. Avoid beans treated with additives and watch for very oily beans that leave residue in the hopper.
When should you adjust the grinder setting while using the machine?
Adjust grind size when you switch beans, change roast levels or notice a flavor shift such as sourness, bitterness or weak body. Follow your model’s instructions and change grind fineness only while the grinder is running. Move one step at a time, then brew again before making another change.
Do you need to preheat cups before brewing espresso?
Preheating cups is not required, but it keeps espresso warmer for longer. Small drinks cool quickly in cold cups, so rinsing a cup with hot water before brewing can support better temperature retention. This is especially useful for espresso, ristretto-style drinks or smaller milk drinks.
Why does my fully automatic espresso taste weak?
Weak espresso may need fresher beans, a stronger drink setting, a fuller body setting or a finer grind. Start by increasing strength one step. If the drink still tastes thin after switching beans or roast levels, adjust grind size only while the grinder is running.
Why is my fully automatic espresso machine not making enough milk foam?
Milk foam can be affected by warm milk, milk type, scale buildup or residue in the frother, milk system or steam wand. Start with cold milk from the refrigerator, run the milk cleaning prompts after milk drinks and clean the steam wand or frother according to your model’s manual.
How often should you clean your fully automatic espresso machine?
Clean your fully automatic espresso machine daily in small ways and follow deeper cleaning prompts as they appear. Empty the drip tray and used grounds container, refresh the water tank, rinse milk components after milk drinks and complete brew unit, filter, milk system and descaling cycles when prompted.